"Open External Editor" integration
GitHub Desktop supports the user choosing an external program to open their local repositories, and this is available from the top-level Repository menu or when right-clicking on a repository in the sidebar.
My favourite editor XYZ isn't supported!
This is the checklist of things that it needs to support:
- the editor supports opening a directory, not just a file
- the editor is installed by the user, so there is a reliable way to find it on the user's machine
- it comes with a command-line interface that can be launched by Desktop
If you think your editor satisfies all these please read on to understand how Desktop integrates with each OS, and if you're still keen to integrate this please fork and contribute a pull request for the team to review.
Windows
The source for the editor integration on Windows is found in app/src/lib/editors/win32.ts.
These editors are currently supported:
- Atom - stable, Beta and Nightly
- Visual Studio Code - both stable and Insiders channel
- Visual Studio Codium
- Sublime Text
- ColdFusion Builder
- Typora
- SlickEdit
- JetBrains IntelliJ Idea
- JetBrains WebStorm
- JetBrains PhpStorm
- JetBrains Rider
- JetBrains CLion
- JetBrains PyCharm
- JetBrains RubyMine
- JetBrains GoLand
- JetBrains RustRover
- Android Studio
- Brackets
- Notepad++
- RStudio
- Aptana Studio
- JetBrains Fleet
- JetBrains DataSpell
- Zed - both Stable and Preview channel
- Pulsar
- Cursor
- Windsurf
These are defined in a list at the top of the file:
/**
 * This list contains all the external editors supported on Windows. Add a new
 * entry here to add support for your favorite editor.
 **/
const editors: WindowsExternalEditor[] = [
...
]
If you want to add another editor, you just need to add a new entry to this list. The compiler will help you with the info needed about the new editor.
The name attribute will be shown in the list of
supported editors inside the app, but will also be treated as the
identifier of the editor, so it must be unique.
The steps for resolving each editor can be found in
findApplication() and in pseudocode looks like this:
async function findApplication(editor: WindowsExternalEditor) {
  // find install location in registry
  // validate installation
  // find executable to launch
}
Step 1: Find the Install Location
Windows programs are typically installed by the user. Installers will add entries to the registry to help the OS with cleaning up later, if the user wishes to uninstall. These entries are used by GitHub Desktop to identify relevant programs and where they can be located.
The registry locations for each editor are listed in the
registryKeys property. Some editors support multiple
install locations, but are structurally the same (for example 64-bit or
32-bit application, or stable and developer channels).
{
  name: 'Visual Studio Code',
  registryKeys: [
    // 64-bit version of VSCode (user) - provided by default in 64-bit Windows
    CurrentUserUninstallKey('{771FD6B0-FA20-440A-A002-3B3BAC16DC50}_is1'),
    // 32-bit version of VSCode (user)
    CurrentUserUninstallKey('{D628A17A-9713-46BF-8D57-E671B46A741E}_is1'),
    // ARM64 version of VSCode (user)
    CurrentUserUninstallKey('{D9E514E7-1A56-452D-9337-2990C0DC4310}_is1'),
    // 64-bit version of VSCode (system) - was default before user scope installation
    LocalMachineUninstallKey('{EA457B21-F73E-494C-ACAB-524FDE069978}_is1'),
    // 32-bit version of VSCode (system)
    Wow64LocalMachineUninstallKey(
      '{F8A2A208-72B3-4D61-95FC-8A65D340689B}_is1'
    ),
  ],
  ...
}
If you're not sure how your editor is installed, check one of these locations:
HKEY_LOCAL_MACHINE\\SOFTWARE\\Microsoft\\Windows\\CurrentVersion\\Uninstall- uninstall information about 64-bit Windows software is found hereHKEY_LOCAL_MACHINE\\SOFTWARE\\WOW6432Node\\Microsoft\\Windows\\CurrentVersion\\Uninstall- uninstall information about 32-bit Windows software is found hereHKEY_CURRENT_USER\\Software\\Microsoft\\Windows\\CurrentVersion\\Uninstall- uninstall information for software that doesn't require administrator permissions is found here
Your editor is probably hiding behind a GUID in one of these locations - this is the key that Desktop needs to read the registry and find the installation for your editor.
As seen in the example above, you can use the following helper functions to enumerate the uninstall keys:
LocalMachineUninstallKeyfor keys inHKEY_LOCAL_MACHINE\\SOFTWARE\\Microsoft\\Windows\\CurrentVersion\\UninstallWow64LocalMachineUninstallKeyfor keys inHKEY_LOCAL_MACHINE\\SOFTWARE\\WOW6432Node\\Microsoft\\Windows\\CurrentVersion\\UninstallCurrentUserUninstallKeyfor keys inHKEY_CURRENT_USER\\Software\\Microsoft\\Windows\\CurrentVersion\\Uninstall
Step 2: Validate The Installation
As part of installing to the registry, a program will insert a number of key-value pairs - Desktop will enumerate these to ensure it's the application it expects, and identify the install location of the application.
There are two steps to this process. The first step is reading the
registry, and you can see this code in getAppInfo():
function getAppInfo(
  editor: WindowsExternalEditor,
  keys: ReadonlyArray<RegistryValue>
): IWindowsAppInformation {
  const displayName = getKeyOrEmpty(keys, 'DisplayName')
  const publisher = getKeyOrEmpty(keys, 'Publisher')
  const installLocation = getKeyOrEmpty(
    keys,
    editor.installLocationRegistryKey ?? 'InstallLocation'
  )
  return { displayName, publisher, installLocation }
}
If you launch regedit and browse to the key associated
with your editor, you should see a list like this in the right-hand
pane:
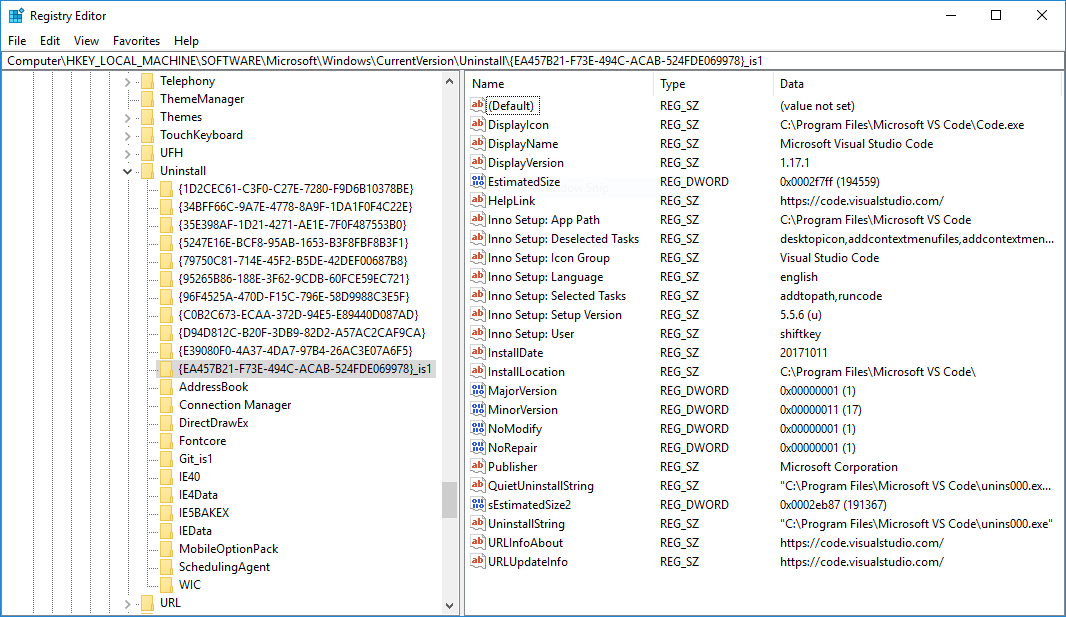
Desktop needs enough information to validate the installation - usually something related to the name of the program, and the identity of the publisher - along with the install location on disk.
The app will look for the app name in the DisplayName
registry key, the publisher in the Publisher registry key,
and the install location in the InstallLocation registry
key. However, this last one can be overridden by setting a different
registry key in the installLocationRegistryKey attribute of
your new editor entry in the editors list.
The second step is to validate the installation:
{
  name: 'Visual Studio Code',
  ...
  displayNamePrefix: 'Microsoft Visual Studio Code',
  publisher: 'Microsoft Corporation',
},
Step 3: Determine the program to launch
Now that Desktop knows the program is the one it expects, it can use the install location to then find the executable to launch. Many editors provide a shim or standalone tool to manage this, rather than launching the executable directly. Whatever options there are, this should be a known location with an interface that doesn't change between updates.
{
  name: 'Visual Studio Code',
  ...
  executableShimPaths: [['bin', 'code.cmd']],
},
Desktop will confirm this file exists on disk before launching - if it's missing or lost it won't let you launch the external editor.
Support for JetBrains Toolbox editors
Now GitHub Desktop support editors installed through JetBrains
Toolbox. The technique used to achieve that is using
jetBrainsToolboxScriptName field to check if, in the
default section for scripts in JetBrainsm Toolbox, a script with the
corresponding name exists.
{
  name: 'JetBrains PyCharm',
  ...
  jetBrainsToolboxScriptName: 'pycharm',
},
Note: Use jetBrainsToolboxScriptName
field only on the main edition of the product. When JetBrains Toolbox
generates the scripts, it doesn't consider the different editions, so
when a new product edition is installed, it generates a shell script
with the same name that overrides the existing one. So it's impossible
to differentiate between the various editions of the same product.
Overriding example:
- Install JetBrains PyCharm Community
- At this point, JetBrains Toolbox will generate a shell script called
pycharm - Install JetBrains PyCharm Professional
- JetBrains Toolbox will generate a new script with the same name,
pycharmand will override the script generated for the community version
The current method supports only the default generated JetBrains Toolbox shell scripts.
macOS
The source for the editor integration on macOS is found in app/src/lib/editors/darwin.ts.
These editors are currently supported:
- Atom
- Eclipse
- All IDE variants (Java, JavaEE, C/C++, PHP, etc.) are supported.
- MacVim
- Neovide
- VimR
- Visual Studio Code - both stable and Insiders channel
- Visual Studio Codium
- Sublime Text
- BBEdit
- JetBrains PhpStorm
- JetBrains PyCharm
- JetBrains RubyMine
- JetBrains CLion
- RStudio
- TextMate
- Brackets
- To use Brackets the Command Line shortcut must be installed.
- This can be done by opening Brackets, choosing File > Install Command Line Shortcut
- To use Brackets the Command Line shortcut must be installed.
- JetBrains WebStorm
- Typora
- CodeRunner
- SlickEdit
- JetBrains IntelliJ IDEA
- Xcode
- JetBrains GoLand
- Android Studio
- JetBrains Rider
- JetBrains RustRover
- Nova
- Aptana Studio
- Emacs
- Lite XL
- JetBrains Fleet
- JetBrains DataSpell
- Pulsar
- Cursor
- Zed
These are defined in a list at the top of the file:
/**
 * This list contains all the external editors supported on macOS. Add a new
 * entry here to add support for your favorite editor.
 **/
const editors: IDarwinExternalEditor[] = [
...
]
If you want to add another editor, you just need to add a new entry to this list. The compiler will help you with the info needed about the new editor.
The name attribute will be shown in the list of
supported editors inside the app, but will also be treated as the
identifier of the editor, so it must be unique.
The function that resolves each editor is
findApplication(), which only looks for the path to the
installation and verifies it exists.
Find bundle identifier
macOS programs are packaged as application bundles, and applications can read information from the OS to see if they are present.
The CFBundleIdentifier value in the plist is what
applications use to uniquely identify themselves, for example
com.github.GitHubClient is the identifier for GitHub
Desktop.
To find the bundle identifier for an application, using
PhpStorm as an example, run
defaults read /Applications/PhpStorm.app/Contents/Info CFBundleIdentifier.
With this bundle identifier, GitHub Desktop can obtain the install location of the app.
The bundleIdentifiers attribute lists all the bundle
identifiers that can refer to the editor:
{
  name: 'Visual Studio Code',
  bundleIdentifiers: ['com.microsoft.VSCode'],
},
AppKit provides an API
for searching for an application bundle. If it finds an application
bundle, it will return the path to the application on disk. Otherwise it
will raise an exception.
Linux
The source for the editor integration on Linux is found in app/src/lib/editors/linux.ts.
These editors are currently supported:
- Atom
- Visual Studio Code - both stable and Insiders channel
- Visual Studio Codium
- Sublime Text
- Typora
- SlickEdit
- Neovim
- Neovide
- Notepadqq
- Mousepad
- GNOME Builder
- Code
- Lite XL
- Kate
- JetBrains PHPStorm
- JetBrains PyCharm
- JetBrains WebStorm
- JetBrains CLion
- JetBrains RubyMine
- JetBrains RustRover
- JetBrains Rider
- IntelliJ Idea
- JetBrains Goland
- Android Studio
- Emacs
- Pulsar
- Pluma
- Zed
These are defined in a list at the top of the file:
/**
 * This list contains all the external editors supported on Linux. Add a new
 * entry here to add support for your favorite editor.
 **/
const editors: ILinuxExternalEditor[] = [
...
]
If you want to add another editor, you just need to add a new entry to this list. The compiler will help you with the info needed about the new editor.
The name attribute will be shown in the list of
supported editors inside the app, but will also be treated as the
identifier of the editor, so it must be unique.
Find executable path
The paths attribute must contain a list of paths where
executables for the editor might be found.
{
  name: 'Visual Studio Code',
  paths: ['/usr/share/code/bin/code', '/snap/bin/code', '/usr/bin/code'],
},